Konda Kadala Curry
Sri Lankan Chickpea Curry (Kadala Curry)
Also known as Chickpea Curry with Coconut Milk, Chana Curry
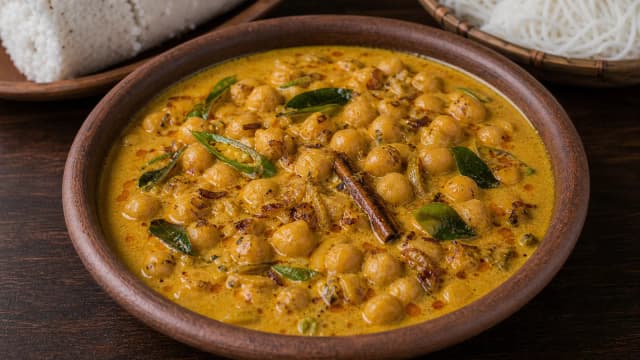
Sri Lankan chickpea curry, kadala curry, is tender chickpeas simmered in a golden, spiced coconut milk gravy with onion, garlic, ginger, curry leaves and roasted curry powder. You'll also hear it called konda kadala curry. It's the saucy cousin of dry tempered kadala. That one is dry and finished with grated coconut, while this one gets loosened with thin coconut milk and finished with thick coconut milk into a mild, rich gravy. It uses everyday pantry spices and either a tin of chickpeas or a pot of soaked dried ones. Spoon it over rice, string hoppers, pittu or roti.

Tender chickpeas simmered in a golden spiced coconut milk gravy: the saucy kadala curry you spoon over rice, string hoppers or roti.
- Total time
- 55 min
- 15 min prep · 40 min cook
- Serves
- 4 people
- Difficulty
- Beginner
- Spice level
- Medium
- Country help
- USA · UK · AU · CA substitutes included
CeylonCooking
ceyloncooking.com/recipes/kadala-curry
Sri Lankan Chickpea Curry (Konda Kadala Curry)
Scan to open on your phone
Nutrition
Estimated values, per serving.
About This Dish
Kadala is the Sinhala word for chickpea. The dry tempered kadala is the famous breakfast dish, but the coconut milk kadala curry is its softer, saucier sibling. Here the chickpeas aren't just coated in a temper. They simmer in a proper gravy, the kind you ladle over rice or soak up with string hoppers and roti. It's humble, cheap and deeply comforting, a plant-based curry that turns a handful of dried beans into something that tastes like a Sunday lunch.
What makes this a curry instead of tempered chickpeas is the coconut milk. Onion, garlic, ginger and curry leaves get softened with warm spices, the chickpeas go in, and then coconut milk turns everything into a gentle, golden sauce. Cooks often build it in two stages: simmer the chickpeas in thinner coconut milk so the spices can really sink in, then finish with a little thick coconut milk for richness. The result is mild, rounded and savoury, with chickpeas tender enough to crush against the roof of your mouth.
You'll also hear it called konda kadala curry, after the chickpea itself. It turns up at breakfast with pittu, string hoppers or bread, and at lunch and dinner on a rice and curry plate. It's forgiving and keeps well, so it's a popular make-ahead curry. A pot of it in the fridge means a quick, sustaining meal is never far away. A sharp pol sambol or lunu miris on the side is the usual finishing touch.
A good kadala curry comes down to tender chickpeas and a balanced gravy. The beans should be soft and creamy, never chalky, and the sauce should coat them without being watery or claggy. Get the coconut milk in at the right moment and warm it gently instead of boiling it hard. You get a smooth, glossy curry that tastes of coconut and gentle spice, not a split, oily one.
The Coconut Milk Gravy: Thin First, Thick Last
What turns chickpeas into a kadala curry is coconut milk, and the trick most home cooks use is adding it in two stages. First, a thinner coconut milk (the second extract of a fresh coconut, or tinned coconut milk loosened with water) goes in to simmer the chickpeas. That gives the gravy time to reduce, the spices time to bloom and the beans time to drink up the flavour without the risk of splitting. Then, near the end, a little thick coconut milk (the rich first extract, or coconut milk straight from the tin) gets stirred through to finish. That gives the curry its smooth, glossy richness.
Here's the thing about coconut milk: it's an emulsion of fat and water, and it splits and turns grainy or oily if you boil it hard for too long. So I do the long simmer in thin milk, then add the thick milk right at the end over gentle heat. That keeps the gravy smooth and creamy. Once the thick coconut milk is in, warm it through but don't let it hit a rolling boil. You'll get a curry that's rounded and silky, not separated. Full-fat tinned coconut milk works perfectly: water it down for the thin stage, then use it neat for the thick finish.
What It Should Taste Like
Mild, creamy, savoury. Tender chickpeas sit in a smooth, golden coconut milk gravy, warmed with curry powder and gentle chilli, fragrant with curry leaves and a little ginger. The sauce should coat the beans glossily, never watery or split, with just enough heat to stop the coconut tasting bland.
Ingredients
This recipe makes 4 servings. Change the number and every amount below updates with it. Substitutes for hard-to-find items are in the sidebar.
The US button converts grams, millilitres and centimetres to ounces, cups and inches. Spoon measures stay exactly as they are.
Open this in the recipe converter
For the Chickpeas
- Dried chickpeas (kadala)soaked overnight, or 2 tins, drained1½ cups
- Ground turmeric½ tsp
- Waterto cover generously
- Salt1 tsp
For the Coconut Milk Gravy
- Coconut oil2 tbsp
- Onionfinely chopped1
- Garlicminced3 cloves
- Gingerminced2 cm piece
- Curry leaves1 sprig
- Pandan (rampe)optional5 cm piece
- Cinnamon1 small piece
- Fenugreek seedsoptional¼ tsp
- Green chilliesslit2
- Tomatochopped, optional1
- Ground turmeric½ tsp
- Sri Lankan chilli powderto taste1 tsp
- Roasted curry powder1½ tsp
- Thin coconut milkor 1 cup tinned coconut milk plus ½ cup water1½ cups
- Thick coconut milkto finish½ cup
- Saltto taste
Method
Follow these 6 steps. Each one explains not just what to do, but why it matters.
Ready to Start Cooking?
The screen shows one step at a time, with just the ingredients that step needs at your serving count, a timer you can tap, and your phone kept awake.
- 01
Soak and Boil the Chickpeas
Soak the dried chickpeas overnight, then drain and boil them with the turmeric in plenty of fresh water for 30 to 40 minutes until tender. Add the salt only in the last 10 minutes. Drain, and keep a little of the cooking water. If you're using tinned chickpeas, just drain and rinse them.
Tender chickpeas are the whole foundation of this curry, so it's worth getting this bit right. Dried chickpeas want a long, unhurried soak, ideally overnight, so they cook evenly to a soft, creamy centre instead of staying chalky in the middle. Simmer them gently, not at a hard rolling boil, which keeps them whole, and hold the salt back until near the end, because salting too early can toughen the skins. A properly cooked chickpea gives easily when you press it and tastes buttery. Tinned chickpeas are already cooked, so they make this a genuinely quick curry, a perfectly good shortcut.

Tip: Save a little of the cooking water (or the tinned liquid). It's lightly starchy, so it's useful for loosening the gravy later if it reduces too far.
- 02
Build the Aromatic Base
Heat the coconut oil in a pot over medium heat. Add the onion, garlic, ginger, curry leaves, pandan, cinnamon, fenugreek and green chillies. Fry until the onion is soft and golden and everything smells fragrant.
This is where the curry's backbone is built, so don't rush the aromatics. The onion should soften and turn sweet and golden, not just translucent. The garlic and ginger lose their raw edge, and the curry leaves crackle and release their citrus-resin perfume the moment they hit the oil. The cinnamon and fenugreek warm the oil with a gentle, rounded fragrance that runs underneath the whole curry. Keep everything moving so nothing scorches. You want golden and fragrant, never dark and bitter.

Tip: A few fenugreek seeds add a subtle, slightly bitter depth that's typical of Sri Lankan curries, but go easy. Too many turn the gravy properly bitter, so a small pinch is plenty.
- 03
Bloom the Ground Spices
Turn the heat down a little and stir in the turmeric, chilli powder and roasted curry powder. Let them cook in the oil for 15 to 20 seconds until fragrant. Add the chopped tomato, if you're using it, and cook until it softens.
Ground spices need only a few seconds in hot oil to wake up and lose that raw, dusty edge. You'll see the oil deepen to red-gold as the curry powder turns toasty. This bit is fast and needs watching, because ground spices burn bitter if left alone, so keep the tomato or liquid right by the pan. Tomato, if you're using it, melts into the base and adds a gentle tang and body to the gravy.

Tip: If the pot looks dry, add a small splash more oil before the spices go in. They need a little fat to bloom, or they'll catch and burn.
- 04
Simmer the Chickpeas in Thin Coconut Milk
Add the drained chickpeas and the thin coconut milk, stir well, and bring to a gentle simmer. Cook for 10 to 15 minutes so the chickpeas soak up the spices and the gravy reduces and thickens a little.
Now it's a curry. Thinner coconut milk gets the longer simmer, so the gravy reduces and the chickpeas drink up the spice without the coconut splitting. That's why it goes in before the thick milk. Keep it at a lazy simmer, not a hard boil, and stir now and then so nothing catches on the bottom. Over these few minutes the sauce deepens in colour and flavour and starts to coat the chickpeas. If you like a thicker gravy, mash a few chickpeas against the side of the pot.

Tip: If the gravy reduces too far before the chickpeas have taken on the spice, loosen it with a splash of the reserved cooking water, not more coconut milk.
- 05
Finish with Thick Coconut Milk
Stir in the thick coconut milk and warm the curry through over low heat for a couple of minutes. Don't let it hit a hard boil. Taste and adjust the salt.
The thick coconut milk gives the curry its final richness and gloss, so it goes in at the end and gets treated gently. Coconut milk splits and turns grainy or oily if it's boiled hard, so keep the heat low once it's in. Just warm it through until the gravy turns smooth and a shade paler. This is the moment to taste and judge the salt. Chickpeas and coconut both soak up more than you expect, and kadala curry falls flat if it's under-seasoned.

Tip: Do not boil the curry once the thick coconut milk is in. A gentle warm keeps the gravy silky. A hard boil is what makes coconut milk split into oily flecks.
- 06
Rest and Serve
Take the curry off the heat and let it sit for a few minutes. The gravy settles and thickens around the chickpeas, then serve warm.
Kadala curry is better for a short rest, like most curries. Off the heat, the gravy thickens slightly and the flavours settle into the chickpeas. It tastes more rounded after a few minutes than straight off the stove. It also keeps and reheats beautifully, so make a generous pot. Serve it warm over rice or alongside string hoppers, pittu or roti, with a sharp pol sambol or lunu miris on the side.

Tip: If you reheat it later, warm it gently with a splash of water or coconut milk. The gravy thickens as it cools and the chickpeas firm up.
Common Mistakes to Avoid
- Don't under-cook the chickpeas. They stay chalky in the centre and never turn creamy in the gravy.
- Don't boil the curry hard once the thick coconut milk is in. It splits into a grainy, oily sauce.
- Don't tip all the coconut milk in at once and simmer it long. Thin first, thick to finish, or it risks splitting.
- Don't leave ground turmeric, chilli and curry powder too long in hot oil. They burn and turn bitter.
- Don't let the gravy reduce too far. It turns claggy, so loosen it with a little cooking water.
- Under-seasoning is a real risk. Chickpeas and coconut soak up more salt than people expect, and the curry ends up flat.
Serving Ideas
- Spoon it over rice with a pol sambol or lunu miris for an easy lunch or dinner.
- With string hoppers or pittu, the coconut gravy soaking in, for breakfast.
- Mop it up with roti, paratha or bread.
- Serve it as the vegetarian curry on a rice and curry plate, next to a vegetable curry and a sambol.
- Add a boiled egg to the gravy for a heartier, protein-rich bowl.
Building a whole plate around it? Start from our vegetarian rice and curry menu, which sets out what to cook alongside it and in what order.
Storage and Make-Ahead
Keeps 3 to 4 days refrigerated in a sealed container, and the flavour deepens overnight. Reheat gently with a splash of water or coconut milk. The gravy thickens and the chickpeas firm up as they cool, so avoid a hard boil or the coconut milk will split. It freezes for up to 2 months. Thaw and reheat gently, stirring to bring the gravy back together.
Two Ways to Cook It
Use two tins of chickpeas and you skip the soaking and boiling. Use one tin of full-fat coconut milk, watered down for the simmer and neat to finish, for the gravy. Fry onion, garlic, ginger and curry leaves, stir in turmeric, chilli powder and curry powder, then add the chickpeas and coconut milk and simmer. Finish gently and season. A genuinely quick coconut chickpea curry.
Soak dried white kadala, or the nuttier brown kala chana, overnight and boil until tender. Squeeze your own first and second coconut milk extracts, and build the gravy with onion, garlic, ginger, curry leaves, pandan, cinnamon and fenugreek. Simmer the chickpeas in the thin milk with roasted curry powder, then finish with the thick milk over gentle heat. Serve with string hoppers or rice and a sharp sambol.
Lighter and Healthier Version
Kadala curry is already a plant-based dish built on high-protein, high-fibre chickpeas. Most of its richness comes from the coconut milk and tempering oil. A few small swaps keep it just as satisfying while trimming the fat, which suits anyone watching calories or cooking it every day.
Use Light Coconut Milk
Use reduced-fat (light) coconut milk, or a little more thin milk and less thick. The gravy stays creamy on noticeably less fat and still tastes of coconut.
Ease Back the Oil
Use a non-stick pot and build the aromatic base with 1 tbsp of oil instead of 2. You still get the fried curry leaf and onion aroma on less fat.
Lean on the Chickpeas
Chickpeas are filling and high in plant protein and fibre. A generous, bean-heavy curry with a modest amount of gravy is satisfying without being rich.
Naturally Vegan and Dairy-Free
Made with coconut milk and oil, the curry is fully plant-based and cholesterol-free. It is a solid source of protein for vegan and dairy-free tables.
Frequently Asked Questions
Kadala curry is Sri Lankan chickpea curry: tender chickpeas simmered in coconut milk gravy spiced with onion, garlic, ginger, curry leaves and roasted curry powder. You'll often hear it called konda kadala curry. It's the saucy version of kadala, unlike dry tempered chickpeas (kadala thel dala). It's mild and creamy, and you eat it with rice, string hoppers, pittu or roti. Kadala is just the Sinhala word for chickpea.
Cooked It? Tell Us How It Went
Your notes on this sri lankan chickpea curry help the next person get it right: what you swapped, what you would do differently, where the recipe should have warned you. Tap a star if you are in a hurry, or write a few lines if you have a minute.
You Might Also Like


Sri Lankan Home Cooking Starter Pack
40 authentic Ceylon recipes made simple for foreign kitchens: spice guide, pantry checklist, substitute guide, 7-day meal plan and printable shopping lists.