Sri Lankan Kokis (Kokis)
Also known as Rosette Cookies
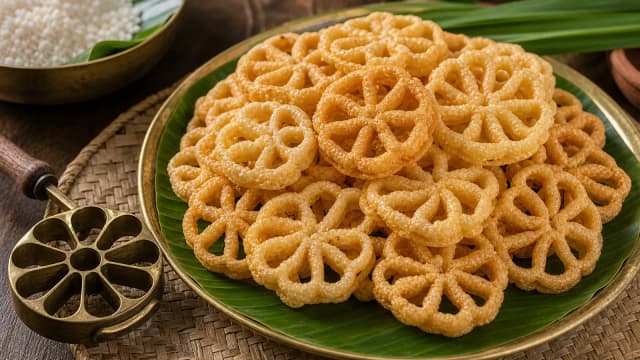
Sri Lankan kokis is a crisp, golden, flower-shaped festival sweet. You dip a hot patterned metal mould into a thin batter of rice flour, coconut milk, egg and a pinch of turmeric, then fry the shape until it crackles free of the mould. It's light, lacy and shatteringly crunchy, the centrepiece of the Sinhala and Tamil New Year sweet tray, and learning the rhythm of dip, fry and release is one of the small joys of the Avurudu kitchen. It belongs to the same family as rosette cookies and achu murukku found across many cultures.

It's the crisp, golden, flower-shaped festival sweet that crowns the Avurudu tray and shatters into shards the moment you bite it.
- Total time
- 45 min
- 20 min prep · 25 min cook
- Serves
- 20 people
- Difficulty
- Advanced
- Spice level
- Mild
- Country help
- USA · UK · AU · CA substitutes included
CeylonCooking
ceyloncooking.com/recipes/kokis
Sri Lankan Kokis
Scan to open on your phone
Nutrition
Estimated values, per serving.
About This Dish
Walk into a Sri Lankan home in the days before the New Year and there's a sound you won't hear at any other time of year: the gentle clink of an iron mould tapping against the rim of a pan of hot oil, again and again, as a tray of golden flowers slowly grows. That sound is kokis. The word itself is borrowed, a leftover from the Dutch koekje. That same little cake travelled the world and became the English cookie, but on the island it took on a shape and a season all its own.
Kokis belongs to Avurudu, the Sinhala and Tamil New Year, when the sweet tray comes out and every household lays on its spread of kavum, kokis, aluwa and mung kavum. Of all of them, kokis is the showpiece of crispness, the one that crackles when you pick it up and dissolves into shards when you bite. Making it is a communal, slightly competitive affair: one cook holds the mould, another watches the oil, and there's always an aunt with an opinion about whose kokis came out lighter and lacier this year.
What makes kokis special is how little it asks of its ingredients and how much it asks of your hand. A thin batter of rice flour, coconut milk and egg, barely seasoned with a pinch of turmeric for that warm gold, is all that goes into it. The skill lives entirely in the dipping: a mould that is hot enough, a batter that climbs just so far up its sides but never over the top, and the small flick that releases a crisp flower into the oil. Get the rhythm and you won't want to stop.
It's comfort and ceremony at once. A tin of kokis sits out for visitors through the New Year season, offered with a cup of tea, snapped in half and shared, refilled when it empties. Long after the oil has been put away, the smell of it frying is the smell of the year turning over, of a house full of people and a tray that somehow never runs out.
The Kokis Mould and the Batter That Clings to It
The whole craft of kokis lives in one tool: the kokis mould, a flower- or star-shaped iron or brass head fixed to a long handle. Unlike a baking mould, it's not something the batter sets inside. Instead the mould is heated in the oil until it's properly hot, then dipped into the cool batter so a thin skin of batter grips its patterned underside and sides. The hot metal flash-cooks that skin on contact, which is exactly what lets the shaped batter slide off into the oil and fry as a free-standing, lacy flower.
Look, that dip decides everything, and two things matter. First, the mould has to be hot, almost at frying temperature, before it touches the batter. If it isn't, the batter won't catch and the shape just refuses to form. Second, the batter can only come partway up the sides of the mould, never over the flat top. Once batter washes over the top, it seals the flower onto the metal like a little cap, and the kokis will not let go. You want the top of the mould clean and dry so there's an open edge for the cooked shape to release from. The batter itself is thin on purpose. Rice flour gives the crispness, coconut milk and egg give a tender golden body, and that pinch of turmeric is there for colour, not flavour.
What It Should Taste Like
It's light, dry and shatteringly crisp, snapping into lacy shards with a faint toasty rice-flour flavour and a gentle coconut richness underneath. The taste is mild and barely sweet on its own. The joy is all in the crunch and those golden, blistered edges. It should never feel greasy, heavy or chewy.
Ingredients
This recipe makes 20 servings. Change the number and every amount below updates with it. Substitutes for hard-to-find items are in the sidebar.
The US button converts grams, millilitres and centimetres to ounces, cups and inches. Spoon measures stay exactly as they are.
Open this in the recipe converter
- Rice flourplain white rice flour1 cup
- Plain flourfor structure, optional2 tbsp
- Thick coconut milk1 cup
- Egglightly beaten1
- Ground turmericfor coloura pinch
- Salt½ tsp
- Sugaroptional, for a faint sweetness1 tsp
- Oilfor deep frying
Method
Follow these 6 steps. Each one explains not just what to do, but why it matters.
Ready to Start Cooking?
The screen shows one step at a time, with just the ingredients that step needs at your serving count, a timer you can tap, and your phone kept awake.
- 01
Mix and Rest the Batter
Whisk the rice flour, plain flour, salt, sugar and turmeric together, then beat in the coconut milk and egg until the batter is smooth, thin and lump-free. Let it rest for 10 to 15 minutes.
The batter is the foundation of every flower you'll fry, so get it smooth before anything touches the oil. Whisk steadily and you'll watch it turn from a pale, clumpy paste into a thin, pourable cream the colour of soft butter. That pinch of turmeric lights it gold. It should be thin enough to coat the back of a spoon and run off in a steady ribbon, never thick like pancake batter. The short rest lets the rice flour drink in the liquid and softens any tiny lumps, which gives you a more even coating and a crisper, less doughy kokis. Stir it again just before you start, because the rice flour settles to the bottom as it sits.

Tip: Strain the batter through a sieve once. A single lump can stop a whole flower from releasing cleanly off the mould.
- 02
Heat the Oil and the Mould Together
Pour enough oil into a deep pan to submerge the kokis mould, then heat it to a steady medium-high. Lower the mould into the hot oil and leave it there to come up to temperature.
This step separates a clean release from a frustrating mess: the mould must be as hot as the oil before it ever meets the batter. As the metal heats, you'll see the oil around it settle into a fine, lively shimmer with the faintest haze rising off the surface. That's your sign it's ready. A cold or barely warm mould is the single most common reason a flower won't catch and form. Give the mould a full minute or two in the oil, and keep the heat steady throughout. Too cool and the kokis drinks oil and turns greasy. Too fierce and it browns before it crisps.

Tip: Test the oil with a drop of batter. It should rise and sizzle briskly within a couple of seconds, not sink quietly or spit violently.
- 03
Dip the Hot Mould into the Batter
Lift the hot mould out of the oil, shake off the excess, and dip it into the cool batter so the batter comes about three-quarters of the way up the sides, never over the flat top. Hold it in the batter for a second or two.
This is the heart of the craft, and the rule is simple: batter on the patterned sides, the top left clean and dry. The screaming-hot metal meets the cool batter and you'll hear a soft hiss, see the batter set into a thin skin on the mould almost instantly. That flash-cooking is what lets the flower slide off later. If the batter climbs over the top of the mould it seals the shape on like a lid and nothing will release it, so dip with control and stop short of the rim. Pause a heartbeat so a good even coat clings, then lift the mould clear.

Tip: Keep the batter in a deep, narrow bowl just wider than the mould. It lets you control how far the batter rises up the sides far more precisely than a shallow dish.
- 04
Fry and Release the Flower
Lower the batter-coated mould straight back into the hot oil and hold it there. After a few seconds the kokis will start to crisp and loosen, so give the mould a gentle shake or tap against the side of the pan and let the flower slip free into the oil.
This is the moment that makes everyone smile the first time it works. Submerge the coated mould and within a few seconds you'll feel the batter firming and see it lift slightly at the edges as it cooks and contracts away from the metal. A light shake or a tap on the rim of the pan is usually all it takes for the flower to let go and float off on its own. If it clings stubbornly, the mould was either not hot enough or batter crept over the top. Nudge it gently with a fork rather than forcing it, so you don't tear the lacy shape.

Tip: Dip the now-empty mould back into the oil to reheat for a few seconds before the next flower. The mould cools each time it leaves the oil, and a reheated mould releases far more reliably.
- 05
Fry Until Crisp and Golden
Let the released flower fry on, turning it once, until it's an even pale gold and crisp all over. Lift it out the moment it stops bubbling and feels firm.
Once the kokis is floating free it needs only a short while to reach its final crackle. Listen to the oil. A busy, steady fizz means water is still escaping and the kokis is not done. As it finishes, the bubbling quietens to almost nothing and the surface settles into a dry, blistered gold. Turn it once so both faces colour evenly. Pull it while it's still pale-to-golden rather than deep brown, because rice flour keeps darkening for a moment in the residual heat and a kokis taken too far turns bitter and loses its delicate snap.

Tip: Fry in small batches so the oil temperature stays steady. Crowding the pan drops the heat and gives you soft, oil-logged kokis instead of crisp ones.
- 06
Drain and Cool Completely
Lift each kokis onto a rack or a tray lined with paper to drain, and let them cool fully before stacking or storing.
Kokis is at its most fragile straight out of the oil and crisps up further as it cools, so this last stretch matters as much as the frying. Resting it on a rack or paper lets the surface oil drain away and stops the bottoms steaming soft against a plate. Listen for the giveaway: a properly fried, fully cooled kokis gives a light, dry rattle when you tap two together. Only once they're completely cool and no longer giving off any warmth should they go into a tin, because the smallest trapped steam will turn that hard-won crunch chewy overnight.

Tip: Resist eating them warm if you want to judge the crisp. They always taste a touch soft until fully cooled, when the true crackle sets in.
Common Mistakes to Avoid
- Dipping a cold or barely warm mould means the batter never catches, and the flower refuses to form.
- Letting the batter run over the flat top of the mould seals the kokis on like a lid, so it won't release.
- Making the batter too thick gives heavy, doughy kokis instead of light, lacy ones.
- Frying in oil that's too cool means the kokis soaks up oil and turns greasy and soft.
- Crowding the pan drops the oil temperature and stops the kokis crisping.
- Over-frying to a deep brown turns the delicate rice flour bitter and dulls the snap.
- Storing kokis before it's fully cooled traps steam, which turns the crunch chewy.
Serving Ideas
- On the New Year sweet tray, right alongside kavum, aluwa and mung kavum.
- Offer them to visitors with a cup of plain or milk tea through the festive season.
- Stack them in a glass jar or tin, so the golden flowers are on show.
- Snap them in half and pass them around, the traditional way.
- As a light, crunchy sweet snack any time of year, not just at Avurudu.
Building a whole plate around it? Start from our sri lankan party menu menu, which sets out what to cook alongside it and in what order.
Storage and Make-Ahead
Cool the kokis completely, then store it in an airtight tin or jar at room temperature. It stays crisp for up to 2 weeks. Moisture is the enemy here: any warmth or steam trapped in the container will soften that crackle within a day, so never seal it while it's even slightly warm. If it does go a little soft, a few minutes in a low oven can revive the crunch. Don't refrigerate or freeze kokis, the damp just makes it chewy.
Two Ways to Cook It
Reach for a small, simple rosette mould and keep the batter on the thinner side. Heat the mould thoroughly in the oil before every dip, and dip only three-quarters up the sides. Your first few flowers may tear or stick while you find the rhythm, that's normal. A teaspoon of plain flour in the batter adds a little forgiveness and structure as you learn.
Use a traditional patterned brass or iron kokis mould, freshly pressed thick coconut milk loosened to a thin pouring batter, and pure rice flour. That gives you the most fragile, lacy crisp. Reheat the mould in the oil between every single flower, find a steady dip-fry-release rhythm, and fry in coconut oil for the most authentic flavour, just as it's done in home kitchens at Avurudu.
Lighter and Healthier Version
Kokis is a deep-fried festival treat, so it'll always be a sometimes food. Still, a few small choices keep it as light and dry as possible rather than greasy and heavy. The fat that matters most is the oil it soaks up during frying, so focus on keeping that to a minimum.
Keep the Oil Hot and Steady
The single biggest lever on fat is oil temperature. Properly hot, steady oil crisps the surface fast, so the kokis absorbs far less of it. Cool oil is what makes greasy, heavy kokis. Fry in small batches to hold the heat.
Drain Thoroughly
Lift each flower onto a rack rather than a plate so the oil drips clean away. Give it a moment over the pan to shed the last drops before it goes down to cool.
Use Light Coconut Milk
Thin the batter with light coconut milk or a splash of water rather than full thick milk. It trims a little fat from the body of the kokis without hurting the crisp.
Make Them Small
A smaller mould gives daintier flowers, so a satisfying handful adds up to less than one or two large pieces. It also helps each one crisp through more evenly.
Skip the Sugar
Kokis is barely sweet anyway, so if you want a savoury, snack-like crisp, just skip the optional teaspoon of sugar entirely.
Frequently Asked Questions
Kokis is that crisp, golden, flower-shaped Sri Lankan festival sweet. You dip a hot patterned metal mould into a thin batter of rice flour, coconut milk and egg, fry the shape until it crackles free of the mould, and what you get is light, lacy and shatteringly crunchy. It's the centrepiece of the Sinhala and Tamil New Year, or Avurudu, sweet tray. The name comes from the Dutch koekje, the same word that gave English the word cookie.
Cooked It? Tell Us How It Went
Your notes on this sri lankan kokis help the next person get it right: what you swapped, what you would do differently, where the recipe should have warned you. Tap a star if you are in a hurry, or write a few lines if you have a minute.
You Might Also Like


Sri Lankan Home Cooking Starter Pack
40 authentic Ceylon recipes made simple for foreign kitchens: spice guide, pantry checklist, substitute guide, 7-day meal plan and printable shopping lists.