Kimbula Banis
Kimbula Banis (Crocodile Bun)
Also known as Sugar Bun
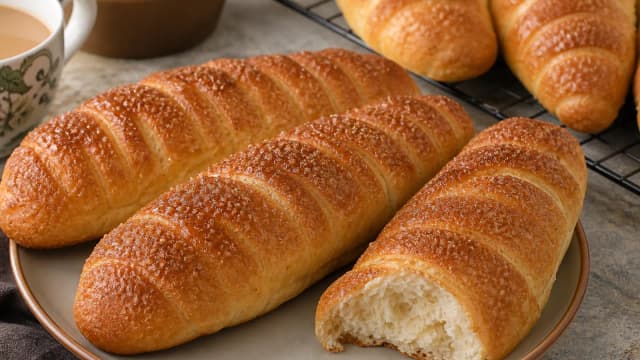
Kimbula banis is the famous Sri Lankan crocodile bun, a soft, lightly sweet enriched yeast bun scored with diagonal ridges and finished with a crunchy sugar crust on top. Kimbula means crocodile in Sinhala, and the name comes from the scaly, ridged look of the cuts across the surface. The crumb is pillowy and barely sweet, the sugar topping is crackly, and the whole thing is the classic bakery short-eat to tear apart with a hot cup of milk tea.

You know the one: the crocodile-shaped sugar bun from the bakery case, soft lightly sweet dough under diagonal ridges and a crunchy sugar crust, made for tea time.
- Total time
- 48 min
- 30 min prep · 18 min cook
- Serves
- 8 people
- Difficulty
- Medium
- Spice level
- Mild
- Country help
- USA · UK · AU · CA substitutes included
CeylonCooking
ceyloncooking.com/recipes/kimbula-banis
Kimbula Banis (Kimbula Banis)
Scan to open on your phone
Nutrition
Estimated values, per serving.
About This Dish
Look into the glass case of any Sri Lankan bakery and you'll spot them at once. Long, golden buns ridged across the top like the back of a crocodile, glittering with sugar. Kimbula banis, the crocodile bun, gets its name from kimbula, the Sinhala word for crocodile, because the diagonal cuts scored across the dough puff up in the oven into rows of scaly ridges. It's one of the most recognisable items in the whole short-eats tradition, those small, cheap, hand-held snacks Sri Lankans eat standing at a counter or with a mid-morning cup of tea, not as a full meal.
Banis is just the Sinhala word for a soft, enriched bakery bun, borrowed long ago from the English 'bun', and bakeries turn out a whole family of them. There's plain banis, the everyday sweet roll. Then there's its showier cousin, kimbula banis, which takes the same tender milk-and-butter dough and dresses it up with two things: the crocodile scoring across the top, and a crust of sugar that bakes into a thin, crackly shell. The bun underneath is only gently sweet, so the sugar topping does the heavy lifting. Every bite gives you a little crunch and sparkle.
Generations of Sri Lankan children grew up on these. A warm kimbula banis split open after school, or torn apart at the breakfast table next to a cup of milky tea, is pure nostalgia for anyone who grew up near a good bakery. For decades almost nobody made them at home. The bakery on the corner did it so cheaply and so well. But the dough is forgiving, the shaping is genuinely fun, and a tray of homemade crocodile buns coming warm out of the oven, ridges sharp and sugar crackling, tastes like a bakery on a slow afternoon.
The pleasure of kimbula banis is all about contrast and simplicity. No spiced filling, no fuss. Just a cloud-soft, faintly sweet crumb, a thin shiny crust, and that signature sugar topping that crunches as you bite in. It's the kind of bun you eat plain and warm, or split and spread with a little butter, and it works as easily for breakfast as for the four o'clock tea break.
Why Is It Called the Crocodile Bun?
Kimbula banis takes its name straight from how it looks. Kimbula means crocodile in Sinhala, and banis means a soft bakery bun, so the whole name reads as 'crocodile bun'. Before baking, the shaped log of dough is scored with a row of shallow diagonal cuts across the top. As the bun proofs and then bakes, those cuts open up and the dough between them swells into raised ridges, so the finished bun looks like the ridged, scaly back of a crocodile. It's one of those wonderfully literal Sri Lankan bakery names, like maalu paan (fish bread) for fish buns, that tells you exactly what you're looking at.
The other signature is the sugar. A plain banis just gets brushed and baked, but kimbula banis gets a crunchy sugar crust on top. Sometimes it's a sugar paste smeared over the ridges before baking, sometimes a scatter of coarse sugar that catches and crackles. That topping is what makes the bun glint in the case and gives it the gentle crunch that sets it apart. The dough itself stays only lightly sweet, so the sugar crust and the soft crumb balance each other, and the whole thing never turns cloying.
What It Should Taste Like
A soft, cloud-like, faintly sweet bun with a thin glossy crust and raised ridges across the top, finished with a crunchy crackle of sugar. The crumb is light and only gently sweet, so the sugar topping carries most of the sweetness and you get a real crunch in every bite. This is the kind of bun you want just warm with tea.
Ingredients
This recipe makes 8 servings. Change the number and every amount below updates with it. Substitutes for hard-to-find items are in the sidebar.
The US button converts grams, millilitres and centimetres to ounces, cups and inches. Spoon measures stay exactly as they are.
Open this in the recipe converter
Dough
- Plain (all-purpose) flourabout 375 g, plus extra for dusting3 cups
- Instant yeast2 tsp
- Sugar4 tbsp
- Salt1 tsp
- Warm milklukewarm, or warm water¾ cup
- Egglightly beaten, plus 1 more for the egg wash1
- Buttersoftened3 tbsp
Sugar Topping
- Sugarfor the crust3 tbsp
- Waterfor a sugar paste, optional1 tbsp
- Coarse or granulated sugarfor scattering on top1 tbsp
Method
Follow these 7 steps. Each one explains not just what to do, but why it matters.
Ready to Start Cooking?
The screen shows one step at a time, with just the ingredients that step needs at your serving count, a timer you can tap, and your phone kept awake.
- 01
Make and Knead the Dough
Stir the yeast and sugar into the warm milk and leave it for 5 minutes, until foamy. Mix in the flour, salt, beaten egg and softened butter, then knead for 8 to 10 minutes, until smooth and elastic.
Foaming is your proof that the yeast is alive, so don't skip it. If nothing happens after 5 minutes, the yeast is dead or the milk was too hot and killed it. The milk should feel pleasantly warm on your wrist, never hot. As you knead, the dough goes from a shaggy, sticky mess to something smooth, springy and a little tacky that pulls back when you poke it. That stretchiness is gluten developing, and it's what gives the finished bun its soft, pull-apart crumb. A stand mixer with a dough hook does the same job in about 5 minutes.

Tip: Resist the urge to add lots of extra flour. A slightly sticky, soft dough bakes into a far fluffier bun than a dry, stiff one.
- 02
First Proof
Shape the dough into a ball and place it in an oiled bowl. Cover it and leave it somewhere warm for about 1 hour, until doubled in size.
This is where the dough builds its lightness. The yeast feeds on the sugar and gives off carbon dioxide, which inflates the dough and gives it a faint, pleasant tang. A warm, draught-free spot speeds it up. A cold kitchen just means it takes longer, so judge by size, not the clock. It's ready when it has roughly doubled and a finger gently pressed in leaves a dent that springs back slowly rather than bouncing straight out.

Tip: No warm spot? Heat the oven to its lowest setting for a minute, switch it off, and let the dough rise inside with the door shut.
- 03
Divide and Shape into Logs
Knock back the risen dough and divide it into 8 pieces. Roll each piece into a smooth ball, then shape it into a short, plump log or oval about the length of your palm.
The log shape is what gives kimbula banis its crocodile silhouette, so take a moment to get it neat. Press each ball flat, then roll it up tightly and seal the seam, so the surface is taut and smooth. A tight skin holds the ridges crisply when you score it later. Keep the logs even in size so they bake at the same rate, and place them seam-side down on a lined tray with plenty of space between them, because they will puff up and spread as they proof and bake. A taut, well-shaped log is far easier to score cleanly than a loose, floppy one.

Tip: Roll each log seam-side down and let it rest a minute before scoring. A relaxed, taut surface takes the ridge cuts much more cleanly.
- 04
Score the Crocodile Ridges
Use a sharp knife or blade and cut a row of shallow diagonal slashes across the top of each log, evenly spaced. That makes the crocodile ridges.
This is the step that turns a plain banis into a kimbula banis, so this is where the crocodile is born. Hold the blade at an angle and make a line of quick, confident diagonal cuts straight across the top, roughly a centimetre apart. You want to go just deep enough to break the surface, not all the way through. As the buns proof and bake, the dough between the cuts swells and opens into a row of raised, scaly ridges, exactly like the back of a crocodile. Confident, even cuts give you the cleanest ridges. Timid sawing drags the dough and blurs the pattern.

Tip: A sharp blade, lightly oiled or floured, slices cleanly without dragging. A blunt knife tears the surface and the ridges come out ragged.
- 05
Second Proof
Cover the scored buns loosely and proof for 30 to 40 minutes, until they look visibly puffy and the ridges have started to open up.
This second, shorter rise is what makes the difference between a dense roll and a light, airy bun, and it is also when the ridges set their shape. The shaped buns relax and puff up again, so they bake tall and soft instead of tight. The scored cuts begin to spread and define the crocodile pattern too. They are ready when they look visibly swollen and feel pillowy, and a gentle press leaves a dent that fills back slowly. Do not let them over-proof, or the ridges slacken and the buns can collapse and lose definition in the oven.

Tip: Keep them somewhere warm and draught-free, loosely covered so the surface doesn't dry out and form a skin that stops the ridges opening.
- 06
Egg Wash and Sugar the Tops
Beat the remaining egg and brush it gently over the buns. For the sugar crust, stir 3 tbsp sugar with 1 tbsp water into a thick paste and dab it over the ridges, or just scatter the coarse sugar generously over the egg-washed tops.
The sugar topping is the signature of kimbula banis, so be generous here. The egg wash sets into a deep glossy golden-brown sheen that makes the buns look like the ones in the bakery case, and it also glues the sugar in place. You can go two ways with the sugar: a sugar-and-water paste smeared over the ridges bakes into a thicker, crackly shell, while a simple scatter of coarse sugar over the egg wash gives a sparkling, crunchy finish that catches the light. Either way, work the sugar over the raised ridges where it will crisp and crackle as it bakes.

Tip: Brush the egg wash gently and don't let it pool in the cuts. Too much egg there can stop the ridges opening and rising evenly.
- 07
Bake Until Golden
Bake in a preheated oven at 190C/375F for 16 to 18 minutes, until the buns are deep golden brown, the ridges are well defined, and the sugar on top has crisped.
Trust the colour and the sugar more than the timer, since every oven runs a little differently. The tops should be a rich, even bronze, the crocodile ridges standing proud, and the sugar crust set and lightly crackling rather than wet. A bun that is properly baked sounds hollow when you tap its underside, the sign the crumb inside has set. Watch the sugar in the last few minutes, because it can catch and darken quickly. If the tops are browning faster than the bases set, loosely tent them with foil. Let them cool on a rack for a few minutes so the steam settles and the sugar crust firms to a crisp finish.

Tip: If you want that extra-soft, glossy bakery finish, brush the warm buns with a little melted butter the moment they come out of the oven. Keep the butter clear of the sugared ridges so they stay crunchy.
Common Mistakes to Avoid
- Using milk that's too hot kills the yeast and the dough never rises.
- Scoring the ridges with a blunt knife drags the dough so the crocodile pattern comes out blurred and ragged.
- Letting the buns over-proof means the ridges slacken and lose definition, and the buns collapse in the oven.
- Skipping the second proof leaves the buns dense and heavy instead of soft and airy.
- Going too light on the sugar topping means the buns miss the crackly crust that defines kimbula banis.
Serving Ideas
- Warm with a cup of Sri Lankan milk tea. It's the classic tea-time short-eat.
- Split and spread with a little butter while still warm so it melts into the soft crumb.
- As a simple breakfast or lunchbox snack, eaten at room temperature.
Building a whole plate around it? Start from our sri lankan party menu menu, which sets out what to cook alongside it and in what order.
Storage and Make-Ahead
These are best on the day they're baked, while the crumb is soft and the sugar crust is crisp. They keep for 2 to 3 days in an airtight container at room temperature, but the sugar topping softens over time, so warm them briefly in a low oven to bring the crumb back before you eat them. Baked buns freeze well for up to 1 month: cool them completely, freeze in a bag, then reheat from frozen in a 160C/320F oven for about 10 minutes. The sugar crust is at its crackliest straight from the oven.
Two Ways to Cook It
Make the dough in a stand mixer, shape simple even logs, and score the ridges with a sharp serrated knife. Finish with an egg wash and a generous scatter of coarse sugar rather than a paste, then bake. This is a forgiving, fun first yeast bake with a real bakery look.
Knead the enriched milk-and-butter dough by hand, shape taut logs, and score sharp, evenly spaced diagonal ridges so the crocodile pattern stands proud. Then brush with a deep, glossy egg wash, smear a sugar paste over the ridges for a thick crackly crust, and bake until the sugar crisps, just like the bakery.
Lighter and Healthier Version
Kimbula banis is a treat, sure, but a few tweaks make it a little lighter without losing the soft crumb and crackly sugar that make it a crocodile bun. They're baked, not fried, to begin with, which already keeps them lighter than many short-eats.
Baked, Not Fried
Kimbula banis are oven-baked rather than deep-fried, so they carry far less oil than fried short-eats like cutlets or rolls, and they still taste like the bakery.
Ease off the Sugar Crust
The dough is only lightly sweet, so most of the sugar is on top. Use a lighter scatter of sugar for a thinner crust if you want to cut the sweetness, and the bun underneath still tastes balanced.
Wholemeal Swap
Replace up to a third of the plain flour with wholemeal flour for extra fibre. The buns stay soft but bake a touch denser, so add a splash more milk.
Less Butter, More Milk
Cut the butter back a little and lean on warm milk for softness. The crumb still stays tender on slightly less fat.
Frequently Asked Questions
Kimbula banis is a soft, lightly sweet Sri Lankan bakery bun. The top is scored with diagonal cuts so it bakes into ridges, and it's finished with a crunchy sugar crust. The name means 'crocodile bun' in Sinhala, because the scored surface really does look like the scaly back of a crocodile. It's one of the country's best-loved short-eats, an enriched milk-and-butter yeast dough baked until golden, usually eaten warm with tea.
Cooked It? Tell Us How It Went
Your notes on this kimbula banis help the next person get it right: what you swapped, what you would do differently, where the recipe should have warned you. Tap a star if you are in a hurry, or write a few lines if you have a minute.
You Might Also Like


Sri Lankan Home Cooking Starter Pack
40 authentic Ceylon recipes made simple for foreign kitchens: spice guide, pantry checklist, substitute guide, 7-day meal plan and printable shopping lists.