Roast Paan
Sri Lankan Roast Paan (Roast Bread)
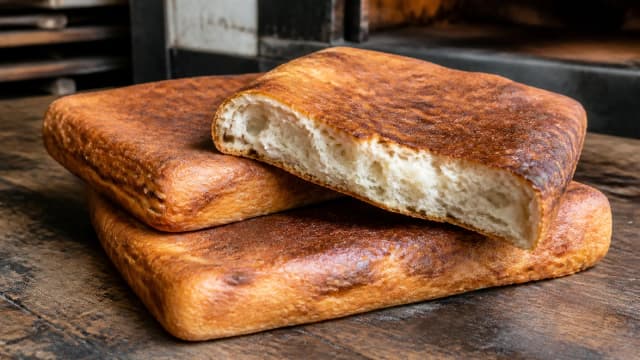
Roast paan is that crusty golden loaf you see in every neighbourhood bakery, deep dark crust outside, soft springy crumb inside. The name comes from the bake itself: a lean wheat flour and yeast dough gets shaped, proofed and baked, then baked again until the crust turns deep brown and properly crackly. That second bake is the roast. Tear it warm and dunk it in dhal, seeni sambol, katta sambol, or any curry. This twice-baked Sri Lankan bread is breakfast and dinner for half the island.

A golden, twice-baked bakery loaf with a deep crackly crust and a soft, open crumb. Tear it and dunk it in dhal.
- Total time
- 60 min
- 30 min prep · 30 min cook
- Serves
- 8 people
- Difficulty
- Medium
- Spice level
- Mild
- Country help
- USA · UK · AU · CA substitutes included
CeylonCooking
ceyloncooking.com/recipes/roast-paan
Sri Lankan Roast Paan (Roast Paan)
Scan to open on your phone
Nutrition
Estimated values, per serving.
About This Dish
Paan means bread in Sinhala, and in Sri Lanka that one word covers soft enriched buns, sweet rolls and stuffed short-eats. Roast paan is the plain, honest one of the family, the crusty loaf that sits in the glass case of every bakery from Colombo to the smallest town, usually sold by the half or whole loaf and still faintly warm if you time it right. It isn't fancy, it isn't sweet. It's just the everyday bread Sri Lankans tear apart with their hands and use to scoop up whatever curry or sambol is on the table.
The roast in the name is the whole point. A lean dough of wheat flour, yeast, a little salt and water gets mixed, kneaded, proofed and baked into a loaf, then it goes back into the oven so the crust deepens to a dark, almost mahogany brown and turns thin and crackly. That second bake is what sets roast paan apart from a soft white sandwich loaf. Sandwich bread is pale and pillowy all the way through, but roast paan has a real crust that snaps and a chewier, more open crumb underneath. Bite into a corner and you get crunch first, then soft.
Roast paan works because it partners with everything else on a Sri Lankan table. Morning and night, it's the bread you tear and dunk: into a bowl of tempered dhal, alongside a spoon of sticky seeni sambol, with the fierce heat of katta sambol, or wiped through the gravy of a fish or chicken curry. It's cheap, keeps a day or two, and if it goes a little stale you can toast it back to a crisp. For a lot of households it's as much a fixture as rice itself, the quiet, crusty backbone of breakfast and dinner.
Bakeries make it in big batches in fierce wood-fired or deck ovens, which is why the shop crust gets so dark and crackly. The good news is you don't need a bakery oven to make a very respectable roast paan at home. With nothing more than plain flour, yeast and a hot domestic oven, plus that signature second bake, you can pull a loaf out of your own kitchen that smells exactly like the bakery on a rainy afternoon and tears open to the same soft, fragrant crumb.
What Is Roast Paan, and Why Roast?
Paan is the Sinhala word for bread, and roast paan is the lean, crusty bakery loaf that gets baked, then baked a second time until the crust turns deep brown and crackly. That extra bake is exactly where the name comes from. The bread goes back in the oven a second time so the outside darkens and crisps, the way you might roast anything else for colour and flavour. It isn't a flavoured or stuffed bread, just flour, yeast, salt and water taken to a deeper, darker bake than an ordinary loaf, which gives it that unmistakable thin, snappy crust and toasty aroma.
Because the dough is lean (no milk, butter or egg, unlike the soft enriched buns in the same bakery case), roast paan is naturally plant-based and far less rich than a sandwich loaf. That leanness is part of its character: it keeps the crumb chewy and the flavour clean and wheaty, so it doesn't shout over the bold dhal and sambols it gets served with. The crust does the talking. The soft inside soaks up gravy like a sponge.
What It Should Taste Like
A deep, dark, thin and crackly crust that snaps when you tear it. Underneath sits a soft, chewy, faintly tangy crumb with an open structure. Clean and wheaty rather than sweet, toasty from the second bake, and built to soak up dhal and curry. Best torn warm.
Ingredients
This recipe makes 8 servings. Change the number and every amount below updates with it. Substitutes for hard-to-find items are in the sidebar.
The US button converts grams, millilitres and centimetres to ounces, cups and inches. Spoon measures stay exactly as they are.
Open this in the recipe converter
- Plain (all-purpose) or bread flourabout 500 g, plus extra for dusting4 cups
- Instant yeast2 tsp
- Sugarto feed the yeast1 tbsp
- Salt1½ tsp
- Warm waterlukewarm, about 320 ml, plus a little more if needed1½ cups
- Oilplus extra for the bowl1 tbsp
Method
Follow these 8 steps. Each one explains not just what to do, but why it matters.
Ready to Start Cooking?
The screen shows one step at a time, with just the ingredients that step needs at your serving count, a timer you can tap, and your phone kept awake.
- 01
Wake up the Yeast
Stir the yeast and sugar into the lukewarm water and leave it for about 5 to 10 minutes, until it turns foamy and smells yeasty.
Look, this step is your insurance. Foam on top is living proof the yeast is active, and if nothing happens after 10 minutes, the yeast is dead or the water was too hot and killed it. Start again then instead of wasting a whole batch of flour. The water should feel pleasantly warm on your wrist, like a baby's bath, never hot. The sugar gives the yeast a quick meal to get going, which is why a healthy mix gets visibly bubbly and smells faintly of bread before you've added a single thing.

Tip: If your kitchen is cool, let the water sit on the warmer side of lukewarm, but err gentle. Heat is what kills yeast.
- 02
Mix and Knead the Dough
Add the flour, salt and oil to the foamy yeast water, bring it together into a shaggy dough, then knead on a lightly floured surface for 10 to 12 minutes until it's smooth, springy and elastic.
Roast paan is a lean dough, so the only thing standing between you and a tough loaf is proper kneading. As you work it, the sticky, ragged mass slowly turns smooth and supple and starts to pull back when you poke it. That spring is gluten developing, the protein network that traps gas and gives the bread its chewy, open crumb and the strength to hold a high rise. Keep the dough on the soft, slightly tacky side rather than dry and stiff, since a wetter dough bakes into a far better crumb. Add water a spoon at a time if it feels tight. A stand mixer with a dough hook does the same job in about 7 minutes.

Tip: Keep the salt and the yeast water from touching directly before you mix in the flour. Salt straight onto yeast can slow it down.
- 03
First Proof
Shape the dough into a ball, put it in an oiled bowl, cover, and leave it somewhere warm for about 1 to 1½ hours, until it has doubled in size.
This is where the bread gets its lightness and a little of its flavour. The yeast feeds on the flour's starches and breathes out carbon dioxide, inflating the dough and building that faint, pleasant tang good bread has. A warm, draught-free spot speeds it along. A cold kitchen just means it takes longer, so judge by size, not the clock. It's ready when it has roughly doubled and a finger gently pressed in leaves a dent that fills back slowly rather than springing straight out.

Tip: No warm spot? Heat the oven to its lowest setting for a minute, switch it off, and let the dough rise inside with the door shut.
- 04
Knock Back and Shape the Loaf
Punch down the risen dough to release the air, then shape it into a smooth, tight loaf, either a long batard or an oval that fits your tin or tray, tucking the seam underneath.
Knocking back pushes the gas into smaller, even bubbles, so the crumb comes out regular, not full of giant holes. Shape it with a bit of surface tension, that's what gives roast paan its high, rounded back. Pull the dough taut as you form the loaf, pinch the seam closed, and set it seam-side down so it holds its shape and doesn't splay flat. You can bake it free-form on a tray for a more rustic, all-around crust, or in a loaf tin for a taller, more even shape. Both work.

Tip: A well-shaped, tight loaf rises up and out. A slack, loose one spreads sideways and bakes flat, so build surface tension as you shape.
- 05
Second Proof
Cover the shaped loaf loosely and let it proof for 30 to 45 minutes, until it's puffy and risen by about half again.
This shorter second rise is what separates a light loaf from a dense brick. The shaped dough relaxes and inflates again, so it bakes tall and airy rather than tight and heavy. Don't let it over-proof to collapse, though. You want it puffy and pillowy: a gentle press leaves a dent that fills back slowly. A deflated dough that doesn't spring back has gone too far. Towards the end, preheat the oven thoroughly, good and hot, because roast paan wants fierce initial heat to leap and set its crust.

Tip: Slash the top with a sharp blade just before baking. The cut gives the loaf a controlled place to expand, so it won't burst out the side.
- 06
First Bake
Bake the loaf in a hot oven at 220C/425F for about 20 to 25 minutes, until it's risen, set and pale golden, and sounds hollow when you tap the base.
The first bake sets the structure. The dough springs up in the heat, the crumb firms, and the loaf takes on a light gold colour. You're not after the final dark crust yet, just a fully baked loaf that sounds hollow. A splash of steam for the first few minutes, from a tray of hot water on the bottom shelf, keeps the crust supple long enough for the bread to rise to full height before it sets. Once it sounds hollow when you tap the base, the inside is cooked and ready for the step that makes it roast paan.

Tip: For a bakery-style crust, throw a few ice cubes or a splash of water into a hot tray on the bottom of the oven as you load the loaf. Shut the door fast to trap the steam.
- 07
Second Bake, the Roast
Take the loaf out, let it cool slightly, then put it back in the oven whole, halved, or cut into thick slices. Bake again at 200C/400F for 8 to 12 minutes, until the crust is deep brown and crackly.
This is the step the whole bread is named for, and most home cooks skip it without realising. The second bake drives off surface moisture so the crust deepens to that dark, almost mahogany brown with a thin, audible snap, and the toasty, roasted aroma builds. Cutting the loaf in half first exposes more surface and gives an even darker, crisper crust all round, closer to what the bakery gets in its fierce ovens. Watch closely towards the end, because the line between deeply roasted and burnt is short. Pull it the moment the crust is dark and crackly and the kitchen smells of toast.

Tip: Want the deepest bakery crust? Slice the loaf thick first, then roast the cut slices a few minutes longer so every face gets crunchy.
- 08
Cool, Then Tear and Serve
Let the roast paan cool on a rack for at least 15 minutes, then tear or slice it and serve warm with dhal, seeni sambol, katta sambol or curry.
Honestly, cooling matters more than it seems. Straight out of the oven the crumb is still setting and a bit gummy, and all that trapped steam needs somewhere to go. Rest it on a rack so the inside can finish and the crust stays crackly instead of going soft and leathery. Tear it by hand, the way it's eaten across the island, so each ragged piece has crust and soft crumb together to scoop up gravy. Roast paan is at its best just warm, when the crust still snaps and the inside is soft and fragrant.

Tip: Please, always rest it on a wire rack, not a plate. Sit it on a solid surface and steam gets trapped underneath, softening that hard-won crust.
Common Mistakes to Avoid
- Skipping the second bake, which leaves you an ordinary pale loaf instead of the deep, crackly roast crust that defines roast paan.
- Using water that's too hot. That kills the yeast and the dough never rises.
- Adding too much flour and ending up with a dry, stiff dough. It bakes into a dense, heavy loaf instead of a soft, open crumb.
- Rushing the proofs. The bread ends up tight and dense instead of light and airy.
- Letting the loaf cool flat on a plate. That traps steam underneath and softens the crust.
Serving Ideas
- Tear it warm and dunk it straight into a bowl of tempered Sri Lankan dhal curry for breakfast or dinner.
- With a spoon of sticky, sweet seeni sambol for that classic bread-and-sambol pairing.
- Wipe it through the gravy of a fish, chicken or potato curry to mop up every drop.
- With fiery lunu miris or katta sambol if you like real heat with your bread.
Building a whole plate around it? Start from our sri lankan breakfast menu, which sets out what to cook alongside it and in what order.
Storage and Make-Ahead
Roast paan is best on the day it's baked, while the crust still snaps. It keeps for 1 to 2 days in a paper bag or loosely wrapped at room temperature. An airtight bag keeps it softer but dulls the crust. To refresh a day-old loaf, sprinkle it with a few drops of water and warm it in a hot oven at 200C/400F for 5 to 8 minutes. That crisps the crust and revives the crumb, and this re-roasting is exactly how leftover paan becomes good again. Baked loaves freeze well for up to 1 month. Cool completely, freeze in a sealed bag, then reheat from frozen in a 180C/350F oven until hot and crisp.
Two Ways to Cook It
Make the dough in a stand mixer, bake it in a loaf tin for an easy, even shape, and do the second bake on thick slices rather than the whole loaf. That's the simplest way to get a crackly crust, and it makes for a forgiving, satisfying first yeast bake.
Knead the lean dough by hand. Shape it free-form into a batard on a tray so you get an all-around crust. Give it a slash and a steamed first bake at high heat, then halve the loaf and roast it a second time until the crust is deep mahogany and crackly, just like the bakery loaf.
Lighter and Healthier Version
Roast paan is already one of the lighter breads in the Sri Lankan bakery case. It's lean, naturally plant-based and baked rather than fried, with no butter, milk or egg. A few small tweaks make it even leaner without losing the crackly crust and soft crumb that make it roast paan.
Naturally Lean and Vegan
Roast paan is made with just flour, yeast, salt and water, so it has no dairy, egg or added fat. That makes it naturally vegan and far lighter than the enriched buns beside it. Leave the oil out entirely for the leanest loaf.
Add Wholemeal Flour
You can swap up to a third of the plain flour for wholemeal or atta if you want extra fibre and a nuttier flavour. The crumb comes out a bit denser, so add a splash more water to keep the dough soft.
Ease off the Salt
Bread quietly adds salt over the day. Cut it back a touch and the loaf still tastes properly seasoned, especially next to boldly spiced dhal and sambol.
Pair It Light
Serve roast paan with tempered dhal, a fresh sambol or a vegetable curry instead of rich oily sides, and you have a genuinely balanced plant-based breakfast or dinner.
Frequently Asked Questions
Roast paan is that crusty golden bakery loaf you see in every Sri Lankan bakery: a deep, dark crust and a soft, springy crumb inside. Paan is Sinhala for bread, and roast paan is a lean dough of wheat flour, yeast, salt and water. It's baked once, then baked a second time until the crust goes deep brown and crackly. This is the everyday bread Sri Lankans tear and dunk into dhal, sambol or curry for breakfast and dinner.
Cooked It? Tell Us How It Went
Your notes on this sri lankan roast paan help the next person get it right: what you swapped, what you would do differently, where the recipe should have warned you. Tap a star if you are in a hurry, or write a few lines if you have a minute.
You Might Also Like


Sri Lankan Home Cooking Starter Pack
40 authentic Ceylon recipes made simple for foreign kitchens: spice guide, pantry checklist, substitute guide, 7-day meal plan and printable shopping lists.